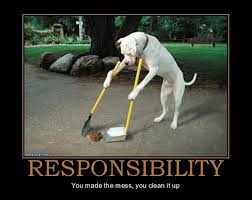
 Okay, hold on to your hat cause what I am about to talk about might just hit home and make you squirm and most likely make you mad.
Can we talk? I mean really and truly have an eye opening discussion about what is really going on in this country? I am not speaking about the Ebola doctor and nurse that ran around possibly harming other people knowing full well they would most likely get sick, nor illegal immigration, 2nd Amendment gun rights, militarization of the police, discrimination of any sort, and not even what is going on down in Ferguson, Missouri…these and so many other ‘happenings’, shall I call them distractions?
These are merely outcomes of personal IRRESPONSIBILTY and abdication of personal responsibility. And they are just that…distractions as to the truth of what is going on in the United States and heck, across the global if you really want to get down to it. Its like a slimy mold that grows and grows…
So lets talk about personal responsibility.
Yeah, you read that right, PERSONAL RESPONSIBILITY. Some of you might have an understanding about what that phrase means, but for those that don’t I will give a real simple explanation as to what that means. It means that YOU are responsible for YOU. What you do, what you say, how you behave. The choices and decisions you make or for that matter, what you don’t do, what you don’t say, what choice you choose NOT to make or what decision you choose not to make. And they all IMPACT OTHERS…NOT JUST YOU.
The dictionary says responsibility is:
the state of being the person who caused something to happen
a duty or task that you are required or expected to do
something that you should do because it is morally right, legally required, etc.
So this begs the question what does RESPONSIBLE mean?
having the job or duty of dealing with or taking care of something or someone
able to be trusted to do what is right or to do the things that are expected or required
involving important duties, decisions, etc., that you are trusted to do
Got it now? Hmm, could personal responsibility be seen as, horrors, being a mature adult? As I see it, too many people in this country have turned over their personal responsibility to others and mainly that is at this point in time, the government or some other state sponsored ‘authority’ .instead of personally taking charge of their own life and making their own informed decisions that guide their actions. With the knowledge inside that its not just about THEM (read that yourself).
Oh, we love to pretend that we are ‘responsible’ but I would beg to differ. How many times have you just gone with the flow? Or instead of spending the time to research something for the real facts you just accept what ‘they’ say as the gospel. Or better yet, when YOU figure out you don’t like what has happened you get angry or feel betrayed because it doesn’t fit the narrative that has been fed to you? OR forbid, say screw it, knowing better and put yourself and others at risk and then have the nerve to say ‘but’…the very word ‘but’ throws out personal responsibility…so… Say it all together now…lets play victim.
See, being personally responsible for yourself means that when you screw up, you own up and try to make it right. When you hurt someone else, you don’t point the finger at someone else. When something bad happens you don’t go looking to place blame, but stand back to see the bigger picture and the role YOU play in that picture. There is a sayin’ ‘if you aren’t a part of the solution then you are part of the problem’. You don’t go looking to Big Brother or your mommy for a handout to bail you out of YOUR MISTAKES. You don’t go around blaming others for what happened or where you are in life. There are too many people who have OVERCOME really bad things and came out on top for me to buy into that one. You get real, not emotional and then accept facts and get going. People who are personally responsible for themselves don’t get stuck in the emotions of the moment. They go through the emotions and then get REAL.
Yeah, things happen and we all find ourselves in circumstances where we need help because we figuratively shot ourselves in the foot, or someone else decided to do something that had an impact on/in our life, but personal responsibility dictates that you ask for help and then get moving on your own again ASAP. Or you just pick yourself up and get moving again. And if something ‘bad’ happens to someone you know, you step back and take a look at their own actions, instead of immediately assigning responsibility to someone else no matter how unattractive or distasteful it maybe. That is called RESPONSIBLE thought. Personal responsibility means that you see things for what they are and not through some lens of victimhood.
And while you’re at it, quit your whining too. Life ain’t FAIR, crap happens and we aren’t all the same, won’t get the same. That is NOT how it works no matter what they want you to believe. The infamous ‘they’ have taught us that its someone else’s JOB to do this, that or the other for us instead of allowing people to fail or succeed. Each according to their own comes to mind. Instead of allowing people to rise above their mistakes, own their mistakes and deal with their own choices, decisions and actions. Its called being accountable, dealing with the consequences of your choices, decisions and actions. When you won’t control yourself, others WILL.
Shall I give a list? War on Drugs, War on Poverty, War on Terrorism, heck, lets thrown in the War on Women…and how has things worked out for Chicago and New York with gun violence? You get my point.
It means being responsible for YOURSELF, YOUR CHOICES, YOUR DECISIONS, YOUR ACTIONS AND THEN DOING THE RIGHT THING FOR YOURSELF AND OTHERS. You aren’t an island…get over yourself. And no one is GOD, until someone hands over their own personal responsibility. Everything you do sends out ripples and affects other people. And when YOU decide to stop having personal responsibility there is the very real danger that not only you will pay the price, but many others will too. And THAT my friends, is when you open the door to being subject to OTHER PEOPLE’S decisions and dominion. You eventually even loose your ability to make your decisions and choices. Keep on not taking PERSONAL RESPONSIBILITY and someone will fill in for you.
I am just as guilty as the next guy for playing the blame game, the whine game and finger pointing, but ultimately YOU and I are the only ones who have dominion over ourselves and once you get THAT figured out, then you truly begin to understand what it means to be personally responsible for YOURSELF. When you stop abdicating YOUR PERSONAL RESPONSIBILITY TO OTHERS that is when you are set FREE. When you teach your children about personal responsibility, accountability and consequences then you and your children are no longer a slave to the ‘they’.
Understand, we are all individuals but when we do not take personal responsibility then others suffer, we suffer and we have no one to blame but ourselves. After all, someone has to do the job right?
 Soungs crazy right? They SAY you can’t do it ‘safely’. But I am hear to say that YES YOU CAN can hard boiled eggs and pickled eggs….Let me dispell the epic myth about canning eggs. The USDA has only this to say: it has not been proven safe to do so. All that really means is that they haven’t taken the time to test it!!! But in FACT people have been doing this for generations and I have yet to find a single case of samonella or botulism related to home canned hard boiled eggs!!!
















Personal Responsibility is the Answer to Our Problems
Can we talk? I mean really and truly have an eye opening discussion about what is really going on in this country? I am not speaking about the Ebola doctor and nurse that ran around possibly harming other people knowing full well they would most likely get sick, nor illegal immigration, 2nd Amendment gun rights, militarization of the police, discrimination of any sort, and not even what is going on down in Ferguson, Missouri…these and so many other ‘happenings’, shall I call them distractions?
These are merely outcomes of personal IRRESPONSIBILTY and abdication of personal responsibility. And they are just that…distractions as to the truth of what is going on in the United States and heck, across the global if you really want to get down to it. Its like a slimy mold that grows and grows…
So lets talk about personal responsibility.
Yeah, you read that right, PERSONAL RESPONSIBILITY. Some of you might have an understanding about what that phrase means, but for those that don’t I will give a real simple explanation as to what that means. It means that YOU are responsible for YOU. What you do, what you say, how you behave. The choices and decisions you make or for that matter, what you don’t do, what you don’t say, what choice you choose NOT to make or what decision you choose not to make. And they all IMPACT OTHERS…NOT JUST YOU.
The dictionary says responsibility is:
the state of being the person who caused something to happen
a duty or task that you are required or expected to do
something that you should do because it is morally right, legally required, etc.
So this begs the question what does RESPONSIBLE mean?
having the job or duty of dealing with or taking care of something or someone
able to be trusted to do what is right or to do the things that are expected or required
involving important duties, decisions, etc., that you are trusted to do
Got it now? Hmm, could personal responsibility be seen as, horrors, being a mature adult? As I see it, too many people in this country have turned over their personal responsibility to others and mainly that is at this point in time, the government or some other state sponsored ‘authority’ .instead of personally taking charge of their own life and making their own informed decisions that guide their actions. With the knowledge inside that its not just about THEM (read that yourself).
Oh, we love to pretend that we are ‘responsible’ but I would beg to differ. How many times have you just gone with the flow? Or instead of spending the time to research something for the real facts you just accept what ‘they’ say as the gospel. Or better yet, when YOU figure out you don’t like what has happened you get angry or feel betrayed because it doesn’t fit the narrative that has been fed to you? OR forbid, say screw it, knowing better and put yourself and others at risk and then have the nerve to say ‘but’…the very word ‘but’ throws out personal responsibility…so… Say it all together now…lets play victim.
See, being personally responsible for yourself means that when you screw up, you own up and try to make it right. When you hurt someone else, you don’t point the finger at someone else. When something bad happens you don’t go looking to place blame, but stand back to see the bigger picture and the role YOU play in that picture. There is a sayin’ ‘if you aren’t a part of the solution then you are part of the problem’. You don’t go looking to Big Brother or your mommy for a handout to bail you out of YOUR MISTAKES. You don’t go around blaming others for what happened or where you are in life. There are too many people who have OVERCOME really bad things and came out on top for me to buy into that one. You get real, not emotional and then accept facts and get going. People who are personally responsible for themselves don’t get stuck in the emotions of the moment. They go through the emotions and then get REAL.
Yeah, things happen and we all find ourselves in circumstances where we need help because we figuratively shot ourselves in the foot, or someone else decided to do something that had an impact on/in our life, but personal responsibility dictates that you ask for help and then get moving on your own again ASAP. Or you just pick yourself up and get moving again. And if something ‘bad’ happens to someone you know, you step back and take a look at their own actions, instead of immediately assigning responsibility to someone else no matter how unattractive or distasteful it maybe. That is called RESPONSIBLE thought. Personal responsibility means that you see things for what they are and not through some lens of victimhood.
And while you’re at it, quit your whining too. Life ain’t FAIR, crap happens and we aren’t all the same, won’t get the same. That is NOT how it works no matter what they want you to believe. The infamous ‘they’ have taught us that its someone else’s JOB to do this, that or the other for us instead of allowing people to fail or succeed. Each according to their own comes to mind. Instead of allowing people to rise above their mistakes, own their mistakes and deal with their own choices, decisions and actions. Its called being accountable, dealing with the consequences of your choices, decisions and actions. When you won’t control yourself, others WILL.
Shall I give a list? War on Drugs, War on Poverty, War on Terrorism, heck, lets thrown in the War on Women…and how has things worked out for Chicago and New York with gun violence? You get my point.
It means being responsible for YOURSELF, YOUR CHOICES, YOUR DECISIONS, YOUR ACTIONS AND THEN DOING THE RIGHT THING FOR YOURSELF AND OTHERS. You aren’t an island…get over yourself. And no one is GOD, until someone hands over their own personal responsibility. Everything you do sends out ripples and affects other people. And when YOU decide to stop having personal responsibility there is the very real danger that not only you will pay the price, but many others will too. And THAT my friends, is when you open the door to being subject to OTHER PEOPLE’S decisions and dominion. You eventually even loose your ability to make your decisions and choices. Keep on not taking PERSONAL RESPONSIBILITY and someone will fill in for you.
I am just as guilty as the next guy for playing the blame game, the whine game and finger pointing, but ultimately YOU and I are the only ones who have dominion over ourselves and once you get THAT figured out, then you truly begin to understand what it means to be personally responsible for YOURSELF. When you stop abdicating YOUR PERSONAL RESPONSIBILITY TO OTHERS that is when you are set FREE. When you teach your children about personal responsibility, accountability and consequences then you and your children are no longer a slave to the ‘they’.
Understand, we are all individuals but when we do not take personal responsibility then others suffer, we suffer and we have no one to blame but ourselves. After all, someone has to do the job right?